How to screen capture dashboards on a schedule with PowerShell
SquaredUp helps customers create dashboards that connect the dots. They do this by assisting users in visualizing and sharing data. And, for the most part, they do this by displaying in dashboards what is happening now. Of course, some visualizations show some historical values or whatnots, but tiles like the WebAPI tile only display a specific value at one particular moment in time.
But have you ever wanted to “see” what your application looked like right before an outage? Or maybe you want to send a screen capture of a dashboard as an email? Or how about capturing an image of a web page via a trigger or on a schedule?
What if you could schedule regular screen captures of your dashboards so you can always look back to a specific point in time?
As you can imagine, the possibilities for how to do this are endless but how easy, or hard, is it to capture a web page? Spoiler alert, the short answer is it depends.
For this blog post, we will look at the choices, demonstrate how to capture an image quickly, and then discuss a more complex solution.
Let’s begin!
Setting Expectations
I guess I got a little ahead of myself. Before we can begin, we need to set some ground rules. As with anything in life, a strong start means a strong finish! First, we need to establish what we’re trying to accomplish, and second, we need to determine how we should do it.
For the ‘what’ part, we obviously want to capture a web page. But are we capturing an image or a PDF? Is there anything else we need to consider? There is, but we’ll get that later.
For now, we want to capture an image file. Why an image file and not a PDF? Well, when you capture an image, you can maintain the screen fidelity. When printing to PDF, sometimes the web page gets garbled. But, if we create a picture first, we can convert it to a PDF later on; a win-win.


There are many things to consider for the “how” part, like cost, complexity, and flexibility. In my case, I want to stick with something that lets me leverage a Windows Server and things like Task Scheduler for capturing images on a schedule.
Second, I want a free, primarily open solution because this will be a set-it-and-forget-it kind of project. And lastly, I want something I can script so that I can quickly get this running, or if I need to add features (like sending email). So, for me, PowerShell now becomes another requirement.
Tools for creating screen captures of dashboards with PowerShell
Doing some quick web searches looking for possible ways to capture a web image of a dashboard with PowerShell, the following options popped up:
Headless Chrome
According to many websites, Headless Chrome has a slick capture function built right into the product. This option made it to my list to investigate. Link:
PowerWebShot
PowerWebShot is a neat little PowerShell tool for making screen captures. This GitHub project sounds like a match made in heaven!
Puppeteer
Puppeteer is a Node library that provides a high-level API to control Chromium. Chromium? Cool, that means I can control Google Chrome or Microsoft Edge (the Chromium version). Hmm, begrudgingly, I add this one to the list.
Headless Chrome
Now that we have our list of possible solutions, I decided to look at Headless Chrome, PowerWebShot, and then Puppeteer.
According to the Headless Chrome documentation, we can call the Chrome browser with a command-line flag, and the image captured magically. From the documentation, I pull out a list of possible commands and string them together. Let’s give it a try.
From a PowerShell command line, I enter this really long command:
<code><strong>&</strong>"C:\Program Files (x86)\Google\Chrome\Application\chrome.exe" --headless --disable-gpu --hide-scrollbars --window-size="1440,1024" --screenshot="C:\users\shawn\desktop\test.png" "https://ds.squaredup.com"</code>And amazingly, an image file appears on my desktop. At this point, I can’t believe how easy that was and now I wrap that command into a quick PowerShell script.
And it works again.
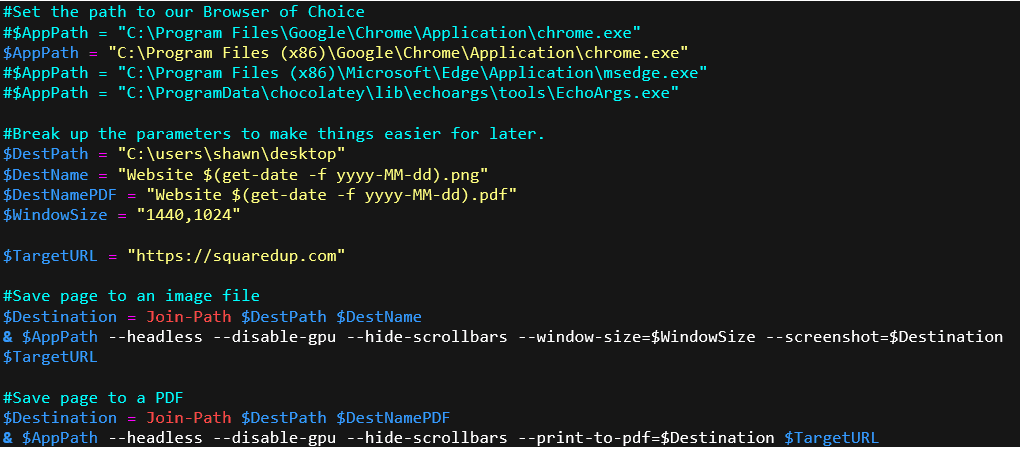
I can barely contain my excitement. I test the script again, except this time, I add the paths for the x64 version of Chrome and Microsoft Edge. I also add some code to export a PDF. Now, my script looks like this:
Simple isn’t always easy
At this point, I’m ready to tackle the world! So, I take this code to a Windows Server and schedule the task to run once a day using Task Schedule. But before I do that, I realize that capturing the SquaredUp home page is boring; I want something with actual data on it. So, I go to our Preview environment, set up an OpenAccess page, and swap out the TargetURL from SquaredUp to the OpenAccess URL.
And it doesn’t work.
I mean, it worked, but it only captured the window “chrome.” Where was the page with all of the colorful visualizations? At this point, I was very, very confused. After much wailing and gnashing of teeth, I figured out that the SquardUp dashboard uses lazy loading as a strategy to load visualization to the page quickly. But why didn’t Headless Chrome capture the page? Despite appearances, it did capture the page. Confused yet? Simply put, Headless Chrome doesn’t know how long to “wait” for the page to load and captures the page too quickly. Alright then, let’s add some delay, right? Nope. Headless Chrome doesn’t have a delay, wait, or whatever flag for us to use.
At this point, I transitioned to PowerWebShot to see if it would work. After reading through the documentation, I realized that PowerWebShot is a PowerShell wrapper around the PhantomJS and Selenium drivers. There wasn’t a “wait” option with the default script, but I assume one could be added since it is based on Selenium. But since I don’t know Selenium, I moved on to the last option.
Puppeteer
The last option was setting up NodeJS and Puppeteer. I didn’t know anything about either of those options, but I did see some posts about wrapping Puppeteer commands with PowerShell. The hardest part was installing NodeJS and Puppeteer. To make this easier for you, I created an installation script and posted it to GitHub here: https://github.com/squaredup/samples/tree/master/tools/New-SqupWebPageCapture
But for those of you who want something quick and easy, open an administrative PowerShell window and execute this command:
<code>iex ((New-Object System.Net.WebClient).DownloadString('https://raw.githubusercontent.com/squaredup/samples/master/tools/New-SqupWebPageCapture/Install-SqupWebPageCapture.ps1'))</code>The script will download and execute, and all of the required components will install with the defaults. When it’s finished, you can download the script to automate the capture of web page images:
<code>.\New-SqupWebPageCapture.ps1 -URL "/" -FilePath "c:\users\user\desktop\test_image.png"</code>Now when I swap out the URL for the OpenAccess page, I get a finished image. If you want to see how I did this, be sure to check out the GitHub page for the function at this location: https://github.com/squaredup/samples/tree/master/tools/New-SqupWebPageCapture
To incentivize you, I added some flags to the New-SqupWebPageCapture script to change the screen size and the amount of time to wait for the page to load.
Tying it all together
Now that I have a working script, I can wrap it with a scheduled task to run every 5 minutes. Another script that runs at the end of the day to zip the folder and another that runs once a week to delete any zips older than seven days. A fully realized process.
TL;DR
For this post we looked at several methods to capture a web page. Unfortunately, simple isn’t always easy and the Headless Chrome option didn’t work for our particular requirements. Digging into the Puppeteer framework gives us some extra capabilities. At the end of of the day, we now have a PowerShell script that installs the solution and a second PowerShell script that provides some flexibility to capture web pages on our schedule.
Good stuff.
-Shawn