Sameer Mhaisekar
DevRel Engineer, SquaredUp & Microsoft MVP

Getting started with SquaredUp is free and easy. Our free tier includes:
Here we see how to chat with your own data in Azure OpenAI, turn on monitoring for it and lastly dashboard that data in SquaredUp.
DevRel Engineer, SquaredUp & Microsoft MVP
GenAI, GenAI, GenAI – we're all talking about it! If you aren't, you're surely hearing about it everywhere. There's been an explosion of "copilots" in recent times and many companies have already started incorporating AI in their products in one way or other.
I am a big AI enthusiast myself, and try to keep up with the things that are emerging out of this trend. One biggest and probably easiest way people and companies are using GenAI today is by making it into a chatbot by feeding your own data to it.
I thought I'd try the same, and share my experience. I'll be deploying a quick Azure OpenAI instance and feeding it a file with some custom data I've prepared, and then I'll try to chat to it. After that, I'll turn monitoring on for the instance and see what metrics I can pull out of it. Lastly of course – we'll tie it all up in nice visualizations using SquaredUp. Here we go!

First, let's take a look at the data we want to feed into OpenAI. I have a file that contains all the data streams for any given SquaredUp plugin and their descriptions. What I'd like to do is to be able to ask OpenAI questions and find out which data stream will give me the data I want to dashboard – simple enough.
One thing to remember here is that the data we're providing to the LLM must be high in quality. It should describe in great detail and clarity the contents of data. The better your input, the better the LLM understands it, and the better the answers you get. So this is what the .xlsx file that I plan to input looks like:

You'll notice the formatting of the document, as well as the detailed descriptions I'm using. I have headers for all my columns to supply the necessary context to the LLM.
I'll go ahead and upload this file on blob storage, which we will connect to the OpenAI instance later to read from.
Now the next thing we'll do is deploy the OpenAI instance itself. Do keep in mind that to deploy the OpenAI instance, you first need to request access to it by filling out a form. The wait for approval may take a day or two.
I already have that in place so I'll go and deploy the instance.
Not a lot to configure here, just the usual and off we go.

Should take a couple of minutes to deploy before we have our instance ready:

The real fun is about to begin in the Azure OpenAI studio, so that's where we go via clicking the button at the top.
This is what you'll be greeted with:

The first thing to do is to deploy a model. Once that's done, we can jump in the playground and see what we can do with it. To do that, click on the "Deployments" model on the left menu. Then click Add a model > Base model.
There you'll see a few different LLMs that you can choose from. What you select will depend on what you want to do with it, and your budget. For now, I'm going to go with GPT 3.5 Turbo, with the following configuration:

Alright now that's done, let's give it shot! Let's head over to Playground > Chat, and select the model we just deployed. We're ready to chat with it!

Great, it's working as expected. But, this is still a generic model that is trained on generic data, not our data. So if I ask it a question from my document, I'll get nothing back, or at least not anything helpful.

Here, the "data streams" I mention to in my question refer to SquaredUp plugins, not what the model has suggested in its response. The model simply doesn't have the relevant data yet. No problem, that's what we'll set up next!
Next to the "System message" field, you'll notice an option to "Add your data". Let's go there and add a data source.
Our data is stored in a storage account. So let's choose that storage account as our data source.

However, we're missing one crucial resource – an Azure AI Search resource. So let's go ahead and deploy that.
It is pretty straightforward to create one:

Note: If you're just playing around with this, remember to delete it once you're done. Otherwise the costs will pile up real quick!
Once you've created the resource, now we add an index. You can create it manually, or import data which will create an index on it automatically. I've found it is easier to do that, so that's what I'll do.

All the fields here are self-explanatory so this should be easy. I'll keep the rest of the things on default and create an index.
Now we go back to adding the data source for our LLM in the OpenAI studio. Select our storage account, our search resource, and our index. Now we're ready to talk to our data!

Voila! Works perfectly. You can now ask questions to your chatbot based on your document. You can deploy this as a web app in Azure with a click of a button too, but for now I'm not going to go there.
Next thing on our plate is to monitor this instance. As you try out your chatbot with a few prompts, you'll already see some platform metrics flowing in. This is great, but I want to capture as much as possible, including the logs.
So we go to our OpenAI instance > Diagnostics setting and create a setting to send all the logs and metrics to our Log Analytics workspace.

Let it sit for a while and you'll see all the logs coming in from your requests to the model.
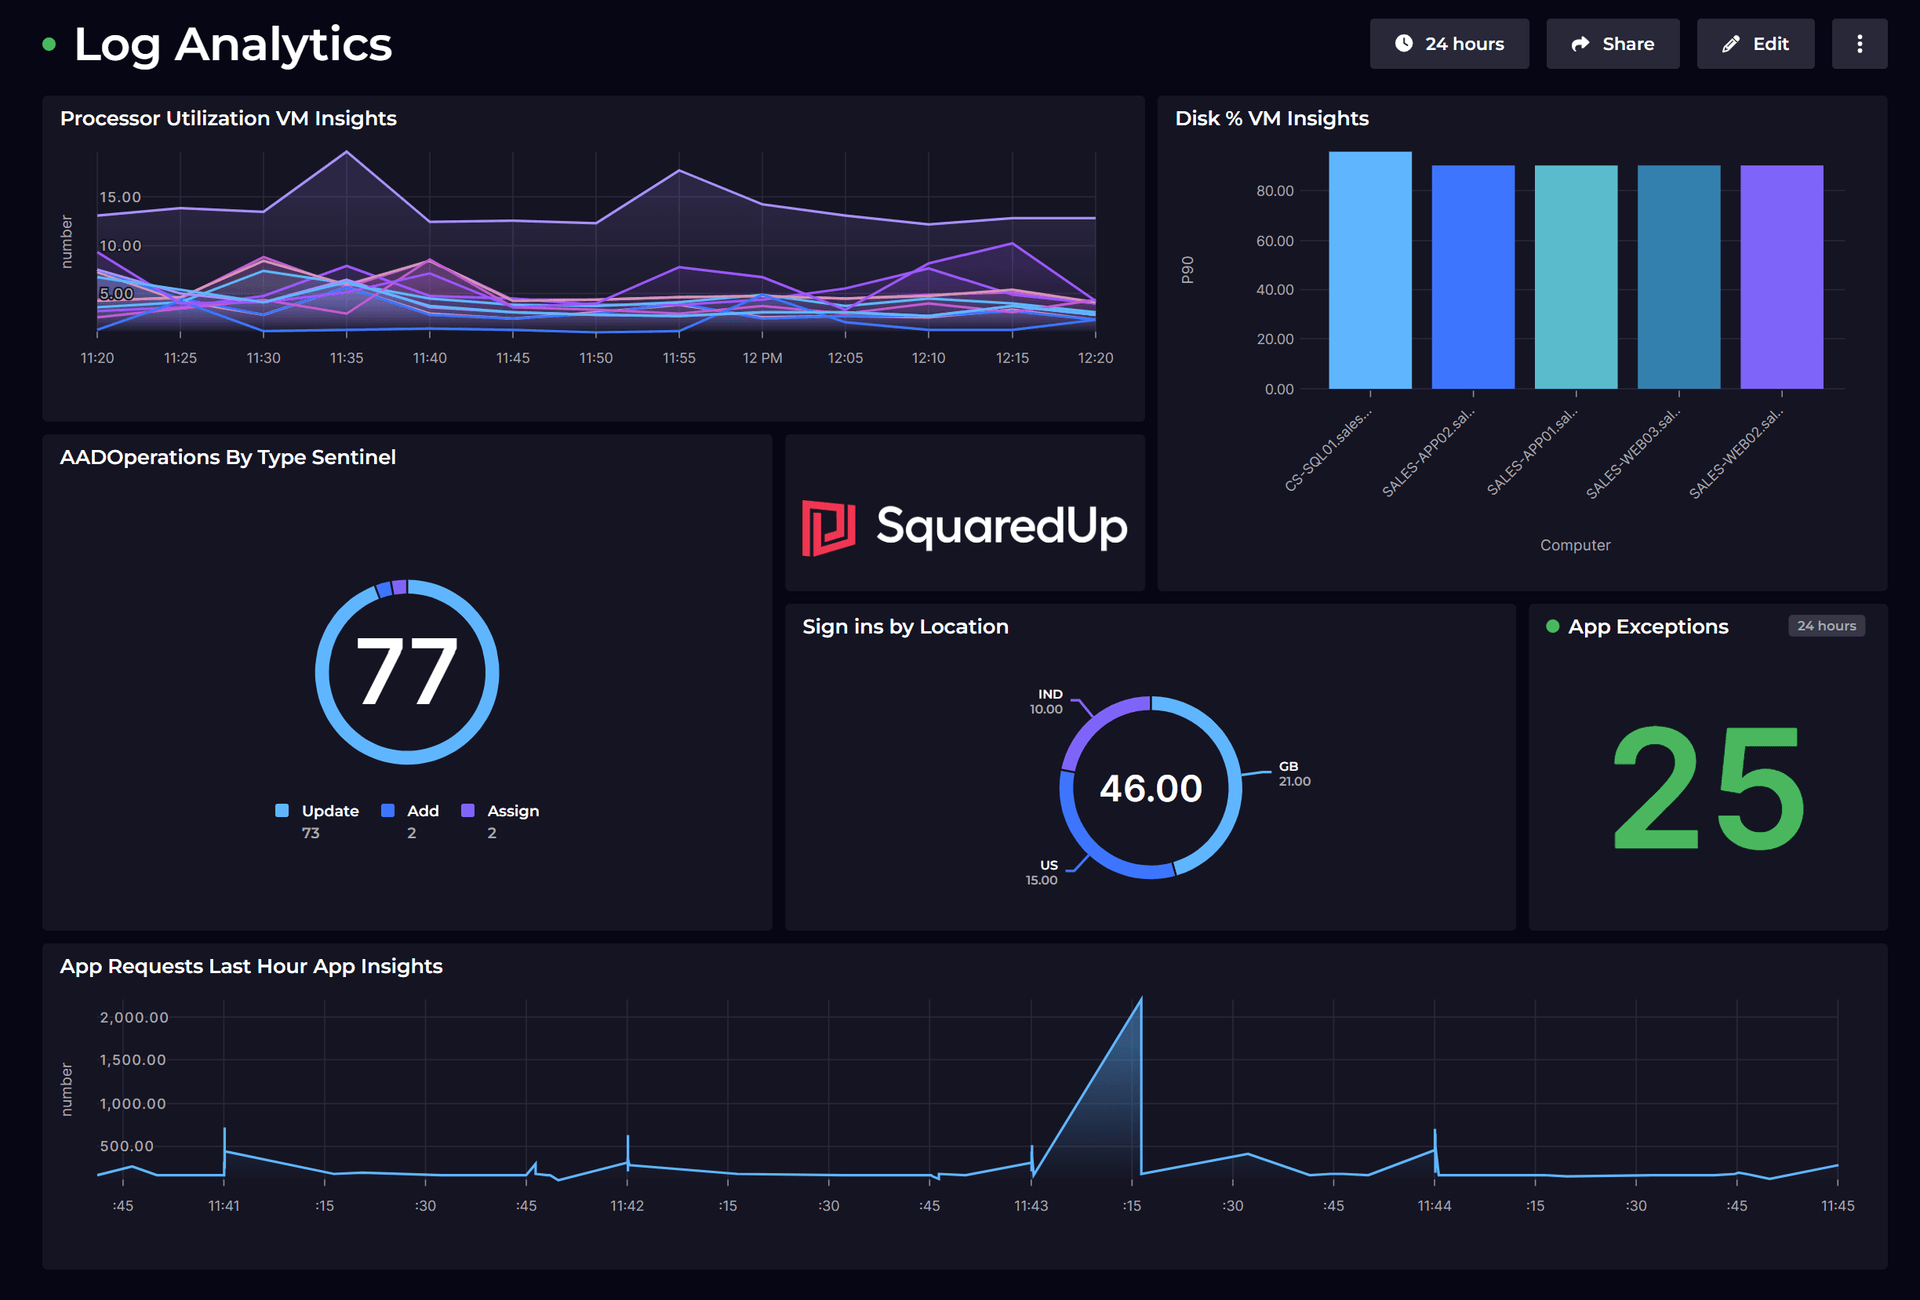
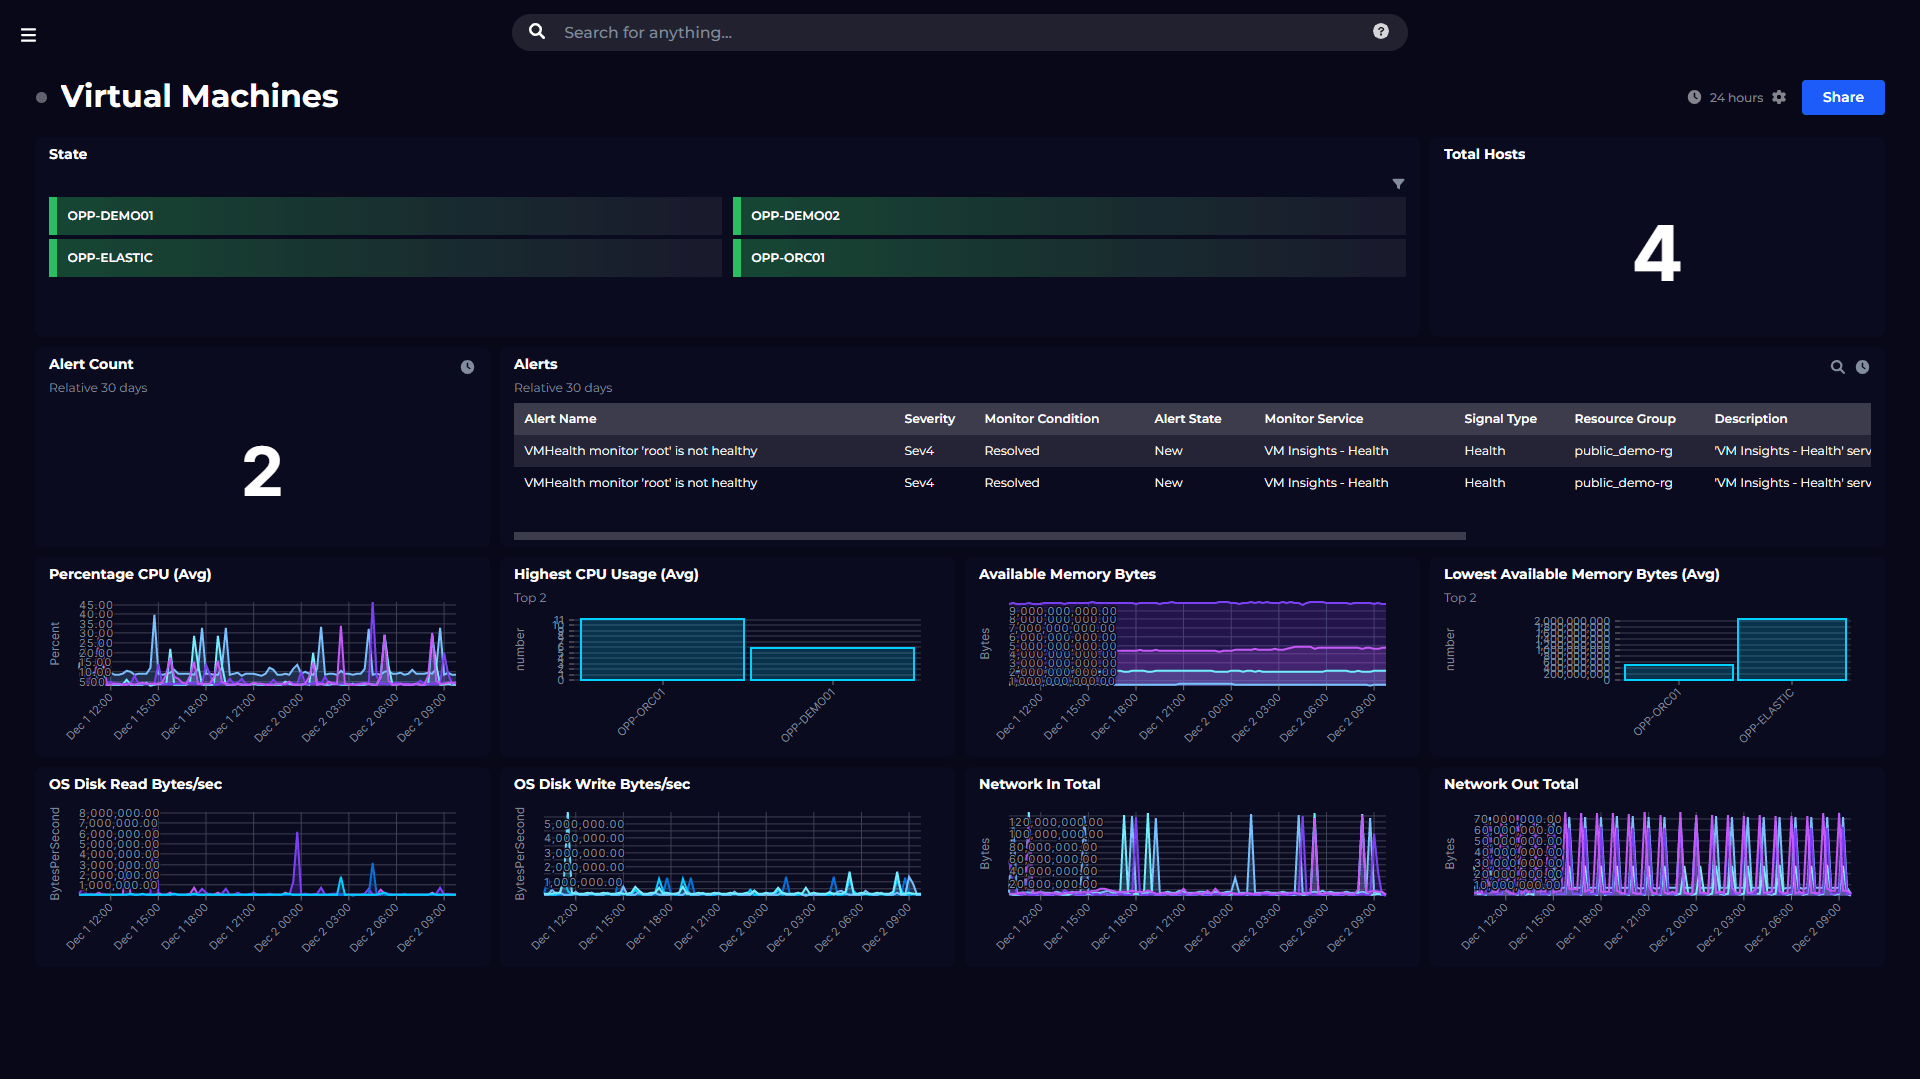
Now for the finale! We have everything ready – we have SquaredUp, we have an OpenAI instance, and we have logs. All we've got to do now in SquaredUp is deploy the Azure plugin, choose KQL data stream, select our Log Analytics workspace, and enter the KQL there.

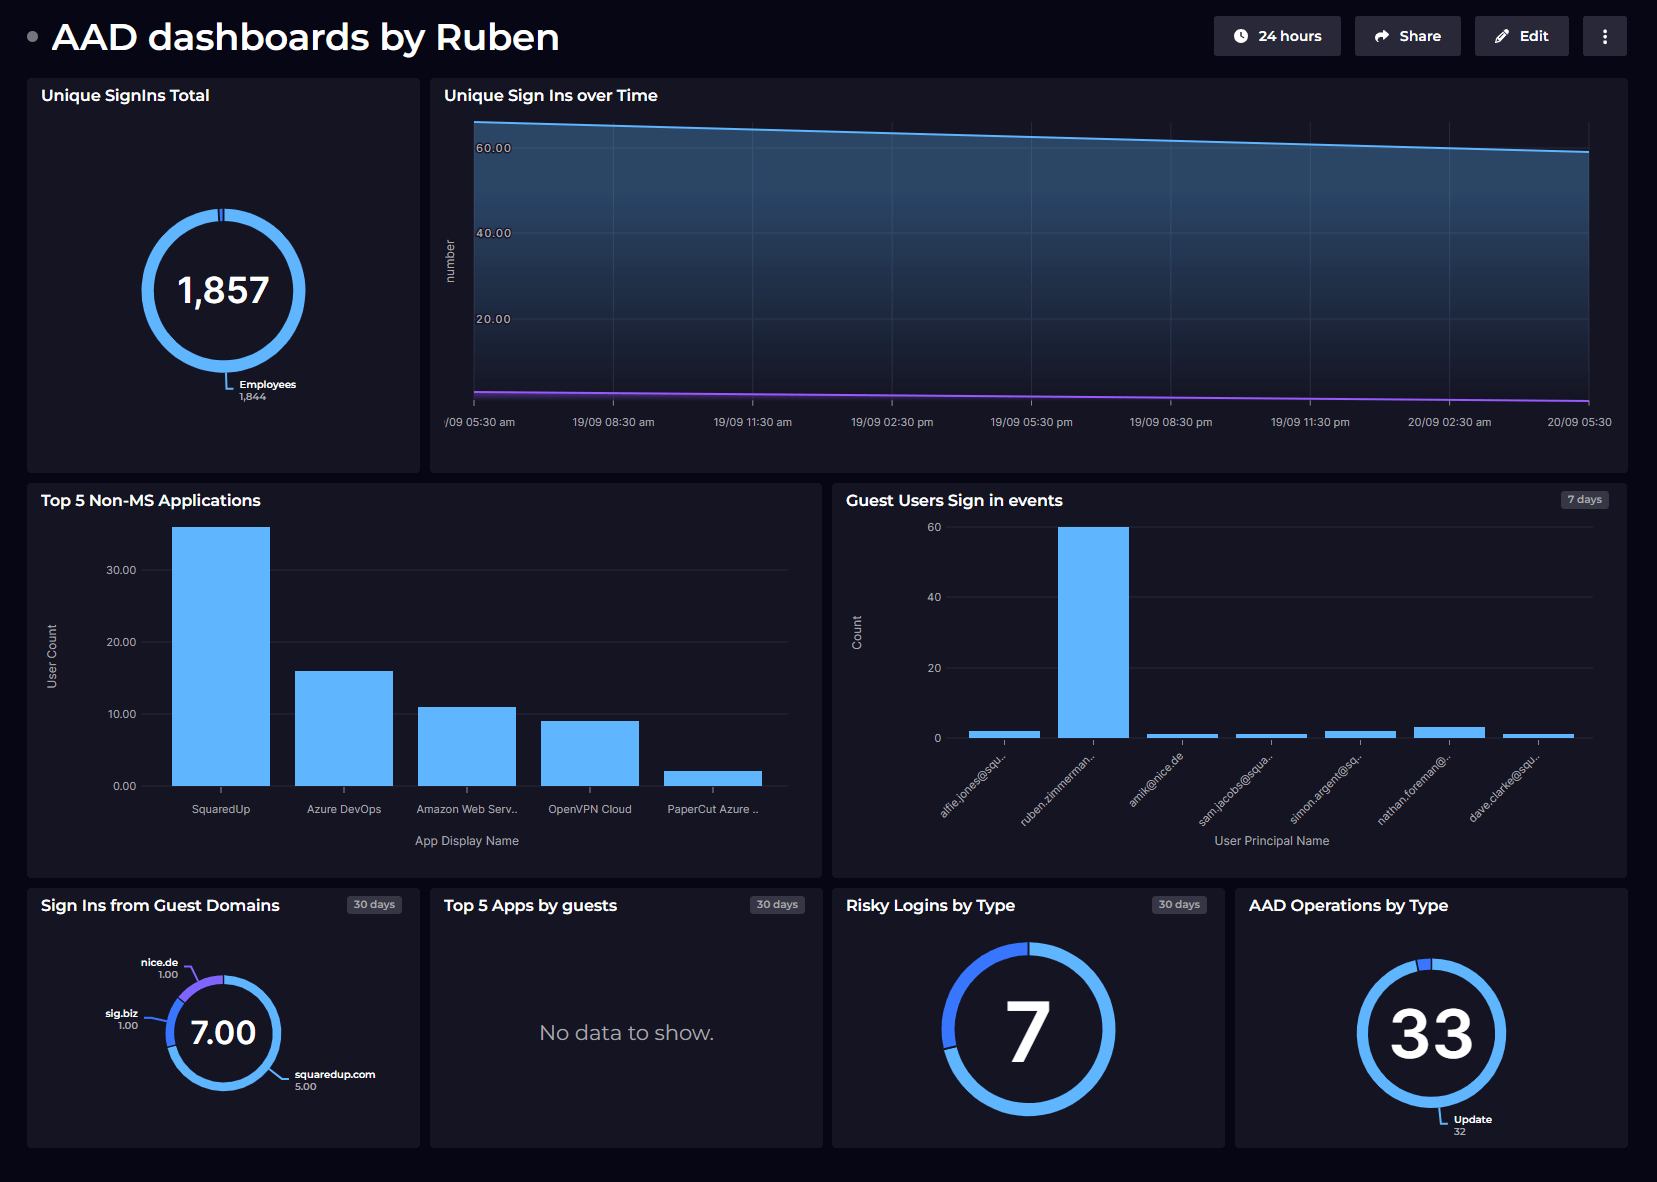
That was easy! Now we repeat this for all the metrics, and we have this beautiful dashboard.

A little bit of a long one this time, but hopefully that was fun!
Happy dashboarding! 📊


Visualize and monitor data from Azure KQL queries.