Stephen Townshend
Developer Advocate (SRE)
Six months ago I attempted to get OpenTelemetry (OTEL) metrics working in JavaScript, and after a couple of days of getting absolutely no-where, I gave up. But here I am, back for more punishment... but this time I found success!
In this article I demonstrate how to instrument a Node.js application for traces using OpenTelemetry and to export the resulting spans to Jaeger.
For simplicity, I'm going to export directly to Jaeger (not via the OpenTelemetry Collector). We'll cover that in another article.
A while ago I wrote a test data (datapool) manager to be used for performance and load testing. I was inspired by JMeter's Simple Table Serverplugin, but wanted a tool agnostic way to persistently host a service that wasn't tied a running instance of JMeter.
So, I wrote my own app in Node.js that provides what I needed. It's a lightweight web app that exposes REST APIs for retrieving, adding, and removing test data. Among other features it supports consumable data and adding data records on the fly.
I used the Datapool Manager for years and found it reliable and invaluable. It's available on GitHub in case anyone is interested (although it's not in a "user-friendly" state).
In this article I am going to instrument the Datapool Manager with OpenTelemetry (specifically for tracing). The Datapool Manager uses native Node.js (not TypeScript... yet) and Express... which is great news for me because the official OTEL documentation for Node.js uses Express in its examples.
In this tutorial we are going to import the OpenTelemetry Node.js SDK into our app. This is going to listen in to when key operations execute and from those generate spans (tracing telemetry data) for us automatically.

Next, we are going to include the OpenTelemetry Node.js exporter. This takes the spans generated by the SDK and pushes them to wherever we want them to go. In our case, we are going to send them directly to the open source distributed tracing platform Jaeger.
Before we can instrument anything we need to import the OpenTelemetry SDK libraries. The following command installs the required packages and saves them as dependencies in package.json:
npm install @opentelemetry/sdk-node \
  @opentelemetry/api \
  @opentelemetry/auto-instrumentations-node \
  @opentelemetry/sdk-metrics --save
If I look in package.jsonnow I can see they've been added under dependencies:

The first step is to enable automatic instrumentation. To do this create a file called instrumentation.jsin the root folder of your project with the following code:
/*instrumentation.js*/
// Require dependencies
const { NodeSDK } = require('@opentelemetry/sdk-node');
const { ConsoleSpanExporter } = require('@opentelemetry/sdk-trace-node');
const {
  getNodeAutoInstrumentations,
} = require('@opentelemetry/auto-instrumentations-node');
const {
  PeriodicExportingMetricReader,
  ConsoleMetricExporter,
} = require('@opentelemetry/sdk-metrics');

const sdk = new NodeSDK({
  traceExporter: new ConsoleSpanExporter(),
  metricReader: new PeriodicExportingMetricReader({
    exporter: new ConsoleMetricExporter(),
  }),
  instrumentations: [getNodeAutoInstrumentations()],
});

sdk.start();
This is a clean way to define our instrumentation without needing to modify the source files of the application itself. That is, until we implement custom instrumentation.
Firstly we need to specify a service name so we can identify our service in Jaeger. There are ways we can add this to instrumentation.js but to keep things simple for now let's set the OTEL_SERVICE_NAME environment variable.
On Mac/Linux use:
export OTEL_SERVICE_NAME="datapool_manager"In PowerShell instead use this instead:
$Env:OTEL_SERVICE_NAME="datapool_manager"Next, to run our app with the instrumentation we just defined we we could manually run the command:
node --require ./instrumentation.js server-core.js --config ./config.jsonBut even better, let's add the above command to package.jsonso that whenever we run npm startthat it will always apply the instrumentation:
"scripts": {
    "test": "echo \"Error: no test specified\" && exit 1",
    "start": "node --require ./instrumentation.js server-core.js --config ./config.json"
  }
Now we can run the instrumented app with:
npm startAfter running the app I can see spans being generated and written to the console:

This is a great start. We've auto-instrumented our Node.js Express app and it is generating spans... but at the moment they're just being written to the console. How can we get these spans exported somewhere useful?
We're about to start exporting our spans, but before we do that we need somewhere to send them. If you're used to the Prometheus model (like me) this might be a little jarring at first.
With Prometheus we generally expose metrics over an HTTP endpoint. Prometheus periodically "scrapes" the endpoint and stores the state of each metric. You can also view these HTTP endpoints in a browser. This is a pull model of telemetry collection.
OpenTelemetry (from what I've seen so far) uses a push model. You configure exporters to push spans or metrics to a consumer. This could be the OpenTelemetry Collector (a tool agnostic way to handle telemetry and send it where you need it), or in our case directly to Jaeger.
Feel free to run Jaeger any way you want, but I'm a fan of using Docker for development and testing like this. Jaeger has an "all in one" Docker image that you can run (provided you have Docker Desktop installed and running) using the command:
docker run -d --name jaeger \
  -e COLLECTOR_ZIPKIN_HOST_PORT=:9411 \
  -e COLLECTOR_OTLP_ENABLED=true \
  -p 6831:6831/udp \
  -p 6832:6832/udp \
  -p 5778:5778 \
  -p 16686:16686 \
  -p 4317:4317 \
  -p 4318:4318 \
  -p 14250:14250 \
  -p 14268:14268 \
  -p 14269:14269 \
  -p 9411:9411 \
  jaegertracing/all-in-one:latest
After running this command it will download and run the image. You can then view the Jaeger UI in a browser by going to http://localhost:16686/:

We're now ready to start pushing spans to Jaeger!
OpenTelemetry includes exporter libraries for Node.js that allow you to push your spans to a consumer. In our case, we're going to push our spans to Jaeger (which is already running).
Firstly, we need to install the following libraries (and add them automatically to package.json):
npm install --save @opentelemetry/exporter-trace-otlp-proto \
  @opentelemetry/exporter-metrics-otlp-proto
Next we need to modify the instrumentation.js file we created earlier to configure the exporter:
/*instrumentation.js*/
const opentelemetry = require('@opentelemetry/sdk-node');
const {
  getNodeAutoInstrumentations,
} = require('@opentelemetry/auto-instrumentations-node');
const {
  OTLPTraceExporter,
} = require('@opentelemetry/exporter-trace-otlp-proto');
const {
  OTLPMetricExporter,
} = require('@opentelemetry/exporter-metrics-otlp-proto');
const { PeriodicExportingMetricReader } = require('@opentelemetry/sdk-metrics');

const sdk = new opentelemetry.NodeSDK({
  traceExporter: new OTLPTraceExporter({
    // optional - default url is http://localhost:4318/v1/traces
    //url: 'http://localhost:9193/v1/traces',
    // optional - collection of custom headers to be sent with each request, empty by default
    headers: {},
  }),
  metricReader: new PeriodicExportingMetricReader({
    exporter: new OTLPMetricExporter({
      //url: '<your-otlp-endpoint>/v1/metrics', // url is optional and can be omitted - default is http://localhost:4318/v1/metrics
      headers: {}, // an optional object containing custom headers to be sent with each request
      concurrencyLimit: 1, // an optional limit on pending requests
    }),
  }),
  instrumentations: [getNodeAutoInstrumentations()],
});
sdk.start();
Note that you can specify the URL (endpoint) to push spans to. I've commented it out so my spans will be sent to the default URL http://localhost:4318/v1/traces which is where Jaeger is listening.
Now go ahead and run the app:
npm startYou'll notice that span data is no longer appearing in the console... because we are sending it Jaeger instead now!
Open http://localhost:16686/ in a browser and you'll be taken to Jaeger. If you already have this page open, refresh it.
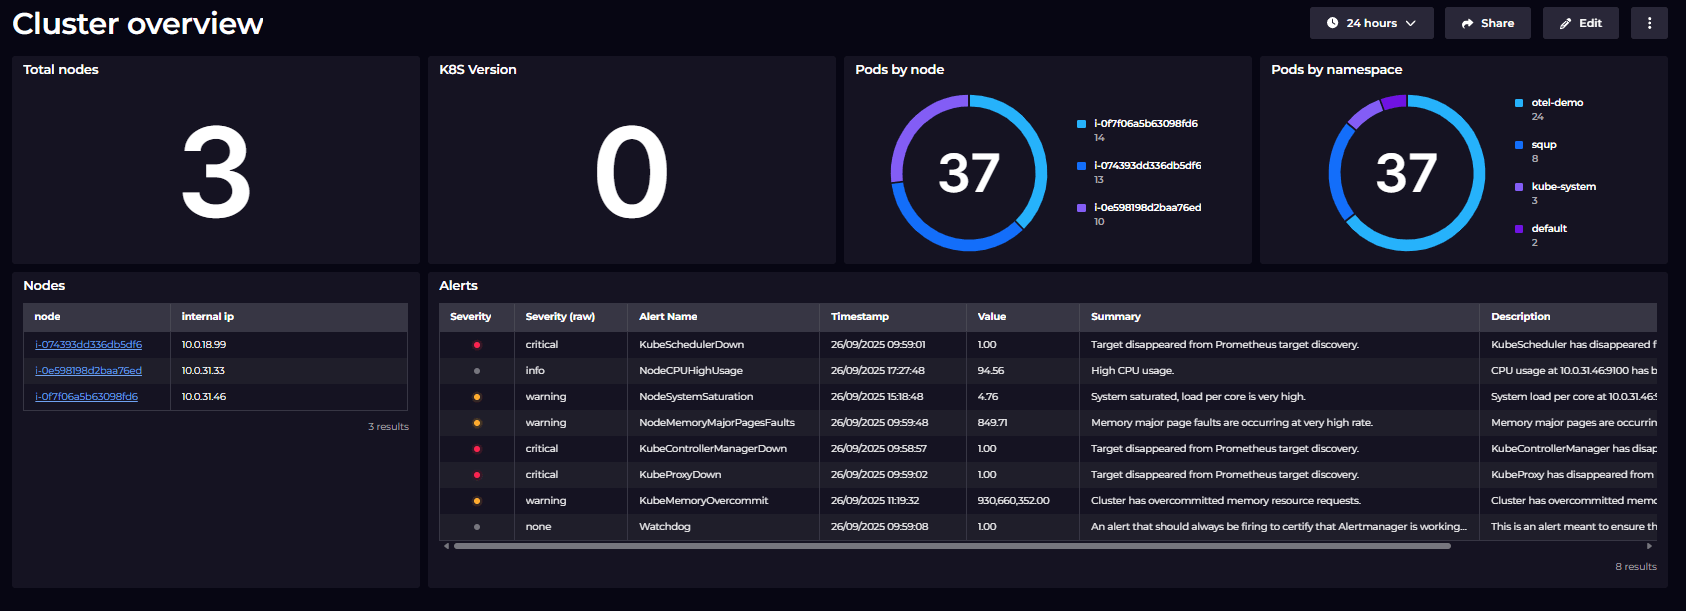
If you click on the Service drop down you should see two services... Jaeger itself, and your app (in my case, datapool_manager which I specified using the OTEL_SERVICE_NAME environment variable earlier):

Select your service and click Find Traces to see the most recent traces collected for this service:

Before I went to Jaeger I requested /dpm/STATUS in the browser a few times to generate some calls, which you can see here. If you click on an individual trace you are presented with a breakdown of the calls captured by our automatic instrumentation:

This trace was captured when I hit the /dpm/STATUS endpoint (which shows me the status of all my datapools). The timeframe is tiny (a few milliseconds) but with what is automatically captured I can see a breakdown of where the time was spent on different internal calls, including parsing JSON and handling encoded URLs.
This out of the box auto-instrumentation is a start, but to be honest I don't understand everything it's telling me. The main thing is that we can see the overall call and how long it took. If this app called other downstream services that were also instrumented for tracing (and pushing spans to the same Jaeger instance) then we would see them all here in one cohesive timeline.
All said and done, it wasn't that hard to get all of this up and running. The OpenTelemetry documentation has come a long way. However, I've only scratched the surface here. Next up I will be exploring the following:
Rest assured, I will be documenting my journey as I go so that you can follow along too.
Developer Advocate (SRE)


By SquaredUp
Monitor any metrics from your Elasticsearch environment using custom QueryDSL, Lucene queries and API calls.

Getting started with SquaredUp is free and easy. Our free tier includes: